18-348 Lab #7
Spring 2015
NOTE: Lab 7 consists of two components (Lab 7 Part A and Lab 7 Part
B).
Relevant lectures:
- Part A: Lecture 12. Time; Timer/Counters; Watchdog Timers
- Part B: Lecture 13. Interrupts (SWI)
Links to all files referenced in the lab and prelab can be found in the
Files section at the end of this document.
Pre-Lab 7 - Part A:
Goal:
- To learn about timers and watchdog timers.
Discussion:
Watchdog Timers
The MC9SC128 has a hardware watchdog timer called the Chip Operating
Properly (COP) timer. Documentation for the COP is somewhat difficult to
find in the datasheet, but the below discussion and sections 9.3.2.9, 9.4.5 and
9.5.2 of the datasheet should get you through it.
NOTE: For this lab we shall assume the course module oscillator clock
operates at 16 MHz, and the bus clock at 8 MHz.
The COP timer is enabled using the COPCTL register. Section 9.3.2.9
describes the bit settings for this register.
- WCOP - This
"windowing" function sets a minimum as well as a maximum time for
resetting the COP. If enabled, a reset sequence (described below) that
comes before the start of the window will cause the chip to be reset.
- RSBCK - For any debugging
application, you should enable RSBCK so that the COP will be paused during
debugging. For deployed applications, you would want to disable this
feature.
- CR2:0 - This value sets
the period of the COP timer. Any non-zero setting enables the COP timer
functionality. Table 9-9 shows various values. The values in the
last column of the table show the number of periods before a COP reset.
Note that the COP timer is based on OSCCLK, the chip oscillator,
not the bus clock. The
oscillator runs at twice the bus speed, so OSCCLK for our module is 16
Mhz. So if CR=0x110 (2^23 from the table), the COP timeout
would occur after 2^23/(16e6)=524.3 ms.
Reset sequence: The watchdog is reset by writing the value 0x55 to the
ARMCOP register, followed by a write of 0xAA. Writing any value other
than 0x55 or 0xAA will force an immediate COP reset. Other sequences of
0x55 and 0xAA are permitted, but will not reset the COP timer. The COP
timer begins counting from the time of the reset, not the end of the original
COP timer period.
Reset action: When the COP reset occurs, the entire chip is
reset. After the reset, the chip determines the source of the
reset. If the reset occured because of the COP, the system will call the
code that begins at the COP reset vector. The vector location for the COP
is $FFFA. So $FFFA must contain the address of the code that should
be run when a COP reset occurs. You can see this implemented in the
lab_7_watchdog.asm file used in the lab. Note that the COP timer is
disabled after the reset and must be re-enabled.
Procedure:
Part 1: Watchdog timer
- QUESTION #1: Analyze the code below to determine the number of clock
cycles from POINT1 to the next time POINT 1 is reached, in terms of the value
of LOOP_PARAMETER. Note that this is the time between COP resets.
Your solution shall have the form:
N(LOOP_PARAMETER)=A + (B *
LOOP_PARAMETER);
Where:
- N=number of cycles between resets, as a function of LOOP_PARAMETER
- B=# of cycles for 1 iteration of the loop, and
- A=the loop overhead for calculating the X register value, updating the
display, and reseting the COP
You may use any method you wish to compute the timing.
loopForever:
;this block
loads the initial loop counter value from
;the dip
switch.
XGDX ;swap D
and X to preserve current value
LDD
#LOOP_PARAMETER ;set the loop counter
NOP
NOP
XGDX ;swap
back
waitLoop:
NOP
NOP
NOP
NOP
NOP
NOP
NOP
NOP
NOP
NOP
NOP
NOP
DBNE X,
waitLoop
;COP reset
requires the $55 / $AA write sequence
LDAB #$55
STAB ARMCOP
LDAB #$AA
STAB ARMCOP
;POINT 1
;increment
the display by rotating the A register
CLC
ROLA
ADCA #0
STAA PTT
BRA
loopForever
|
- QUESTION #2: Read discussion section of this lab, and sections
9.3.2.9, 9.4.5 and 9.5.2 of the
MC9S12 data
sheet. Assume that COPCTL is set to $C4. Determine the period
(in ms) of the COP timer.
- QUESTION #3: Using the formula you derived above, compute the
minimum and maximum values of LOOP_PARAMETER that will allow the loop to run
without causing a reset on the board. In other words, what is the largest
and smallest value of LOOP_PARAMETER that will reset the COP timer within the
window, based on the code and the settings of COPCTL.
Part 2: Timer
This part of the prelab is to familiarize you with the timer control
registers.
Match the list of possible entries below each table to the blanks in the
table. Review section 15.3.2 of the
MC9S12 data
sheet for information about the registers referenced below:
Register bits
|
Function
|
| TSCR1:7 |
|
| TSCR1:6 |
|
| TSCR1:5 |
|
| TSCR1:4 |
|
| TSCR2:7 |
|
| TSCR2:3 |
|
| TSCR2:[2:0] |
|
Table A.1: Timer control register parameters
Put each of these values into Table A.1 above. HINT: use each
value only once.
- Counter reset inhibited if cleared
- Fast clear of all timer flags (when accessing data) if set
- Interrupt occurs when timer rolls over if set
- Timer enable if set
- Timer prescaler
- Timer runs in freeze mode if cleared
- Timer runs in wait mode if cleared
For the various values of PR (aka TSCR2:[2:0]), compute the length of
a timer tick in microseconds. Note that a timer tick is the time it takes
the timer to increment once (not the "rollover" time). Assume
the bus clock is 8Mhz. Fill these into Table A.2 below:
PR Value
|
Timer Tick Length (us)
|
0
|
|
1
|
|
2
|
|
3
|
|
4
|
|
5
|
|
6
|
|
7
|
|
Table A.2: Prescaler values
Pre-Lab 7 - Part B:
Goal:
- To learn about about SWI operation and implement a very simple debugging
tool.
Discussion:
As discussed in class, the SWI instruction can be used to implement a
breakpoint debugging tool in almost any system that keeps programs in RAM, even
if it doesn't have hardware debugging support. As it turns out, the course
processor keeps its programs in flash memory and does have hardware debugging
support, but we still want you to get a feel for SWI as a way to ease into how
interrupts work. So, in this lab we'll be compiling an SWI instruction into the
midst of a program and using that instruction as a run-time monitoring device.
What we want you to build is a run-time monitor that uses SWI to display
current register values on LEDs. You'll use a button to select which byte from
which register to display. You might even find this capability useful in future
projects as a run-time monitoring mechanism.
For any further information on interrupts, please refer to the lecture notes
or Chapter 5 of the
MC9S12 data
sheet.
Procedure:
Write an assembly language program that will demonstrate basic functionality
needed without being a complete implementation. In particular, you will read
inputs from and write outputs to memory locations rather than switches and
LEDs. We encourage you to use the simulator to convince yourself that your
program works, but we do not expect you to get it working on real hardware
until the lab section. (If you choose to use the simulator or do the bonus, you will find the instructions from the lab section helpful.)
The program you write must meet the following requirements:
- The program to be handed in shall be an SWI service routine entirely in
assembly language. Assume that the program is entered from somewhere else in
the system via executing an SWI instruction. (This implies that the SWI vector
has been set to point to this program.)
- The program shall use an RTI instruction to end execution (i.e., to return
execution to the instruction after the SWI that invoked it).
- The program shall read an 8-bit memory location you define as a selection
value. Based on that selection value, the program shall put an 8-bit value from
a selected CPU register into a second 8-bit result memory location you define.
The values selected shall be according to the following list:
SELECTION VALUE
REGISTER
$00
do not
change result
$01
A Register
$02
B Register
$04
X Register (top byte)
$08
X Register (bottom byte)
$10
Y Register (top byte)
$20
Y Register (bottom byte)
$40
Stack Pointer (bottom byte)
$80
Condition Code Register
- The program shall obtain values from stack memory locations saved by the
SWI, and NOT from the registers themselves (except if the register requested
incidentally happens to be used to store the value retrieved from the stack, or
if the register is not stored on the stack by the SWI).
Bonus (Optional):
Create a test program that sets distinct values in all the registers in a main
program, then exercises the SWI to check for proper operation of all selection
values. The program shall compile and run with the simulator so that proper
operation can be determined in the simulator by listing the values of those
memory locations.
Requirements:
Each iteration of the main testing loop:
- Shall change value in the selector memory location (to select a new
register)
- Shall execute an SWI instruction
- Shall copy the result memory location to the appropriately named variable
in memory they declare.
- All possible selection values shall be tested over some multiple iterations
of the loop.
Hand-in Checklist: (85 + 8 points)
All non-code submissions shall be in a single PDF document.
Part A:
- (10 points) Answer to question #1 from part 1.
- (10 points) Answer to question #2 from part 1.
- (5 points) Answer to question #3 from part 1.
- (10 points) Fill in Table A.1 above.
- (10 points) Fill in Table A.2 above.
Part B:
- (40 points) Program listing as a text file with a .asm extension. Name this
file prelab_7_swi_andrewID.asm (with your appropriate andrew ID in the file
name). The only thing we want in this text file is the actual SWI service
routine as commented assembly language so that we can combine it with a test
program to execute it.
- (Bonus: 8 points) Optional. Simulator project that tests operation of SWI
service routine as described above. For credit please turn in complete project.
Refer to the LAB FAQ for more information on lab
handin procedures and file type requirements. You MUST follow these
procedures or we will not accept your submissions.
Lab 7 - Part A
Goal: To implement timers and watchdog timers on the MC9S12
module.
Discussion:
This discussion covers techniques for time-keeping using the crystal
oscillators and timers. This technique involves using a state machine to
sample and detect timer rollover. Time is kept in a fixed-point
fractional format.
Definitions:
rollover - the timer value (read from TCNT) is a up-count value.
That is, it starts at 0 and is incremented by 1 for every timer tick.
When the timer reaches its maximum value, 2^16-1 or 65535, the next increment
will return it to 0. This event is known as rollover.
Suppose the timer is running at 8 MHz. (Setting the prescaler to
0). This means that timer tick period is:
- 1 / 8e6 [Hz]= 125 [ns]
(1)
Since the timer value (TCNT) is a 16-bit value, a full timer rollover will
be:
- 125 [ns] * 2^16=8.192
ms
(2)
We accumulate time in a 32-bit value (unsigned long), where we represent 1
second as 0x10000. That is to say, the upper 16 bits represent whole
seconds, while the the lower 16 bits represent fractional seconds. Using
the period for timer rollover that we calculated in (2) above, we compute the
representation of 8.192 ms in our fixed point notation:
- 8.192e-3 [s] * 0x10000
[1/s]=536.87
(3)
- which we round to 537 or
0x219
(4)
So we add 0x219 to our counter value every time we detect a
rollover. But how do we detect a counter rollover? The simplest way
would be to monitor the value (TCNT==0) in a loop. But if we have other
processing to do in our loop, we might miss this. Instead, we use the
state machine pictured below to monitor the MSB of TCNT.
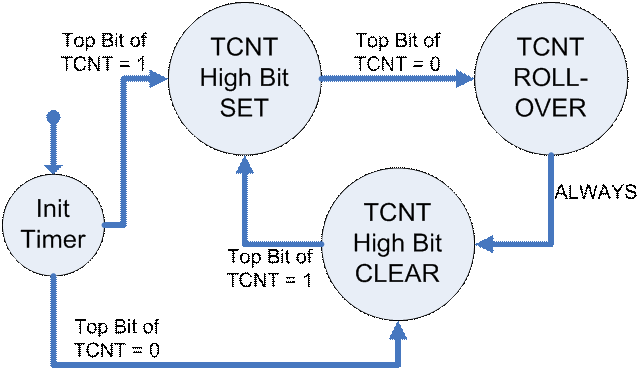
Figure 1: Timer Rollover Detection State Machine
Every time the state machine enters the TCNT_ROLLOVER state, we increment
our counter value by the value we computed in (4).
The only thing we must ensure is that we sample TCNT at least twice during
the timer period computed in (2) This restricts the amount of processing
we can do in the monitoring loop.
Procedure:
Part 1:
- Download the lab_7_watchdog.asm
file. Rename it to lab_7_watchdog_gxx.asm.
- Wire the board according to the instructions at the top of the file.
- Start a new assembly project using the 348 assembly stationery and replace
the main file with lab_7_watchdog_gxx.asm.
- Run the program and find the minimum and maximum values of PTAD that do not cause a watchdog reset.
Note: The value of PTAD is used for the most significant byte of the loop
counter. This means that changing the PTAD input changes the loop counter
by $100, so the loop counter resolution is quite coarse.
Part 2:
For this part of the lab, you will implement a stopwatch according to the
time-keeping techniques described in the discussion above and the lecture notes
from lecture 12.
Note: For your reference, a call to lcdSimpleWrite() requires no
more than 17 ms to complete.
- Make the following connections on the board (note that Port T and Port AD
are not used, so this wiring is compatible with the wiring for Part 1).
- Wire PA0 on the MCU to PushButton1
- Wire PB4 on the MCU to PushButton2
- Ensure that the jumpers are properly placed on the board for you to use the
lcd_lib files to display LCD values.
- Download the lab_7_stopwatch_skeleton.c file.
Rename it to lab_7_stopwatch_gXX.c.
- Create a new C project, and replace main.c with the renamed skeleton
file. Add the lcd_lib files to your
project.
- Add the modclock files to your project
to change the CPU module clock speed up to 8 MHz.
- Repeat the calculations from the Discussion section above to compute the
fractional time which must be added to your software time count after each
timer rollover.
You shall implement a stopwatch program that meets the following
requirements:
- The stopwatch shall start counting time from 0 when PB1 is pressed.
- The stopwatch shall stop counting time when PB2 is pressed.
- The stopwatch program shall display the count in the format
"minutes:seconds" on the LCD panel.
- The module timer prescaler shall be configured so the timer runs at 0.5
MHz.
- The module timer shall be free running (i.e. you may read TCNT but never
reset it).
- The stopwatch shall monitor the TCNT value for rollover using the state
machine from Figure 1.
- The stopwatch clock shall be accurate within 1 second per 2 minutes
elapsed time.
Test your program using a stopwatch or a watch with a second hand. To
receive full credit, your device must remain synchronized (maintaining time to
within 1 second of) a reference timepiece for 2 minutes (120 seconds).
You may tune the fractional time parameter added after each rollover to adjust
your clock accuracy. You will have to justify any deviation from the
value you computed in step 4.
Bonus: Part 3 (Optional):
This bonus part is based on Part 1 above. In the original
lab_7_watchdog.asm file, the value of PTAD is used for the
most significant byte of the loop
counter. This means that changing the PTAD input changes the loop counter
by $100, so the loop counter resolution is very coarse. Modify the
lab_7_watchdog.asm file so that the value of
PTAD is used for the least significant
byte. Hard-code the most significant byte to the maximum PTAD value you
identified in part 1. Use this program to identify the exact maximum loop
counter value. Save this program file as lab_7_watchdog2_gxx.asm.
Questions:
- List the minimum and maximum PTAD values for part 1.
- Are your results from Part 1 consistent with your computations from the
prelab? If not, what was the source of the discrepancy? (100 words
maximum)
- Compute the margin for PTAD. Do this by computing both the minimum and
maximum using the formula: 100% * [(COP_time - loop_time) /
COP_time ].
- Show your calculations similar to those in the discussion section of the
lab for how you computed the fractional time value you use to increment the
time variable in your program. You shall number the equations in your
calculations consistent with the calculations in the discussion section.
- Did you modify/tune the fractional time value used to increment your
counter? If yes, explain why you chose to modify it. (100 words maximum)
- Predict the accuracy by determining the number of seconds the clock will
show after 10,000 seconds (use the techniques shown in lecture 12, but with the
values for this lab).
- BONUS: From part 3, record the hard-coded most significant byte that the
maximum PTAD value that allowed the loop to run without reset. Note that
these two values together comprise the LOOP_PARAMETER from the prelab.
Did you find the same value you computed in your prelab? Why or why not?
(100 words maximum)
- BONUS: Using the setup from part 2, test your clock against real digital
stopwatch (for example, a stopwatch mode on a wristwatch). Start both at
the same time and let them run for at least one hour (the longer the better
within reason). Stop both at the same time and compute the time error of your
clock (e.g., drifted 13 seconds in 8 hours is a 0.045% drift rate). Is this as
close as you could get or using this information should you slightly adjust
your values? (We're not asking you to do the adjustment and re-run the
experiment; just tell us what adjustment, if any, you would make.)
Part A - Demo Checklist: (50 + 5 points)
- (20 points) Demo the watchdog program to the TA. You must
demonstrate the minimum and maximum values by showing that the program
functions normally (LEDs chase) at MIN_VALUE and MAX_VALUE and fails at
(MIN_VALUE - 1) and (MAX_VALUE + 1).
- (30 points) Demo the stopwatch program to the TA. To receive
full credit, you device must remain synchronized with a reference timepiece for
2 minutes (120 seconds) and behave according the requirements above.
- Bonus: (5 points) (Optional) Demo lab_7_watchdog2_gxx.asm. Show that
the program works at MAX_VALUE and fails at MAX_VALUE + 1. In order to
receive credit for any of the bonus (including the bonus questions), you must
successfully demo the bonus program to the TA.
Lab 7 - Part B
Goal:
- To implement and test an SWI service routine on real hardware.
Discussion:
In this lab, you will take one of the prelab SWI handlers with suitable
modifications and get it to work on the course hardware. (You can use either
prelab submission, combine them, make changes, or start over from scratch as
you desire. There is no bonus or penalty based on which partner's prelab is
used as the starting point.)
Procedure:
Part 1:
- Connect LEDs and Switches so that you have 8 LEDs and 8 Switches
available. We strongly suggest you do this in a way that does not conflict with
the hardware requirements for the other half of this lab.
- Modify the code described in the prelab to read selection values from
switches and write result values to the LEDs (with "1" bits displayed
as an "on" LED). Name this file lab_7_swi_gXX.asm.
- Add an assembly language main loop that sets the various registers to
distinct values and repeatedly executes an SWI within the loop. Use these
values:
REGISTER VALUE
A
$11
B
$22
X
$3344
Y
$5566
CCR
any value,
but tell the TA what it is
SP
any
value, but tell the TA what it is
BONUS (Optional):
As a separate program, modify the SWI monitoring capability so that you can
display and modify any one of up to 256 predetermined memory locations while a
C program is executing. The C program shall be one of your choosing that
executes SWI once every time through its main loop. The bytes being displayed
and modified shall be the bytes of a 64-element 8 bit integer C array. Name
this file lab_7_swi_bonus_gXX.c.
Part B - Demo Checklist: (50 + 5 points)
- (50 points): Demonstrate to the TA that the appropriate register values
display when you press buttons. The TA may ask you to change the value in a
register via editing and recompiling your program to verify correct operation.
- (Bonus 5 points): Optional. Demonstrate to the TA that your bonus memory
display and modification function works properly.
Hand-in Checklist: (175 + 17 points)
All non-code submissions shall be in a single PDF document.
Part A:
- (5 points) List any problems you encountered in the lab and pre-lab, and
suggestions for future improvement of this lab. If none, then state so to get
these points.
- (20 points) Submit your lab_7_watchdog_gxx.asm file. The
coding style sheet must be followed to
receive full credit.
- (30 points) Submit your lab_7_stopwatch_gXX.c file. The
coding style sheet must be followed to
receive full credit.
- (65 points) Answer questions 1-6 in part A above.
- Bonus: (6 points) (optional) Submit lab_7_watchdog2_gxx.asm.
- Bonus: (6 points) (optional) Answer bonus questions 7-8 in part A
above.
Part B:
- (5 points) List any problems you encountered in the lab and pre-lab, and
suggestions for future improvement of this lab. If none, then state so to get
these points.
- (50 points) Submit code files for your SWI monitoring routine and
associated main program. Name the file lab_7_swi_gXX.asm. Code must be fully
commented to receive full credit.
- (Bonus: 5 points) Submit code files for your SWI memory display and
modification routine and associated main program. Name this file
lab_7_swi_bonus_gXX.c. Code must be fully commented to receive full credit.
Refer to the LAB FAQ for more information on lab
handin procedures and file type requirements. You MUST follow these
procedures or we will not accept your submissions.
Hints and Suggestions:
Part A:
- Be careful as to whether you should multiply by 8 MHz or 16 MHz with the
processor module. (One is oscillator speed; the other is system clock speed.)
- Some students have reported linker errors when using the C type
"unsigned long". If that happens, use "unsigned long int"
instead. In the C programming language they are supposed to be equivalent, but
apparently there is some problem with Code Warrior on this point.
- There have been some reports of the LCD displaying strange values. We've
updated our drivers since last year, but it could be a hardware weakness. If
you have weird LCD behavior, reset and reload the board. If this becomes a
serious issue for you, please contact a TA and (1) give us a complete zip file
of the software you were running at the time via e-mail (so we can be sure it
isn't a driver bug that's our fault -- we won't grade it, but this lets us run
it to see what happens), and (2) swap out your board for a new one (so we can
figure out if it is a hardware problem specific to your board, or just a
general design weakness).
- The simulator can be very helpful for analyzing timing loops! It has a
decent model of the COP and timer peripherals as well, but you'll need to
change the default oscillator frequency in the simulator to get correct
results.
FILES for this lab:
Part A:
Part B:
Relevant reading:
Also, see the course materials
repository page.
Change notes for 2015:
- 3/15/15: Specified for Lab 7 part A that we want the min/max values of PTAD that do not cause a watchdog reset.