Project 1: Testlight Example
*Please submit all project-related questions to  -- thanks!
Example:
An example controller specification called
"TestLight" is provided here.
Constants
- TestlightFlashHalfPeriod - a value equal to half the desired
flashing period for the TestLight. This value corresponds to the
amount of time TestLight should be on or off when flashing.
State
- Counter - a counter to keep track of the passage of time.
Requirements
- TL.1. The hallLight[f,b,d]
should flash on and off with a period of 1 second.
- TL.2. If mDoorClosed[front, left] is false,
the hallLight[f,b,d] shall
remain On.
- TL.3 If mDoorClosed[front, left] is
true and hallCall[f,b,d]==pressed,
hallLight[f,b,d] shall
begin flashing.
- TL.4 mHallLight[f,b,d]
shall always be set to the same value as hallLight[f,b,d].
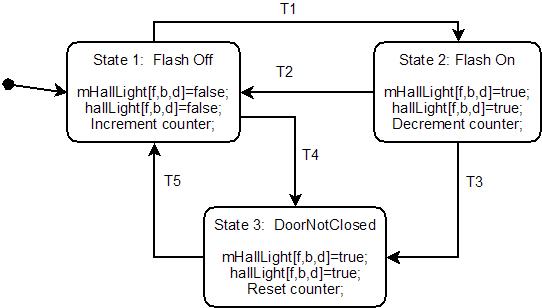
Statechart
Here
is the TestLight Statechart
(you will learn more about statecharts in
project 4):

Transition
|
Condition
|
TL.T.1
|
Counter >=
TestlightFlashHalfPeriod && mDoorClosed[front,
left] == true |
| TL.T.2 |
Counter <= 0 &&
mDoorClosed[front,
left] == true |
| TL.T.3 |
mDoorClosed[front, left] == false |
| TL.T.4 |
mDoorClosed[front, left] == false |
| TL.T.5 |
mDoorClosed[front, left] == true
&&
hallCall[f,b,d] == pressed |
Requirements to Statechart Traceability
completed by STUDENT NAME (ANDREW ID)
|
Requirements
|
States
|
TL.1
|
TL.2
|
TL.3
|
TL.4
|
State
1: Flash Off
|
X
|
|
|
X
|
State
2: Flash On
|
X
|
|
|
X
|
State
3: DoorNotClosed
|
|
X
|
|
X
|
Transitions
|
|
|
|
|
TL.T.1
|
X
|
|
|
|
| TL.T.2 |
X
|
|
|
|
| TL.T.3 |
|
X
|
|
|
| TL.T.4 |
|
X
|
|
|
| TL.T.5 |
|
|
X
|
|
Implementation
See the TestLight.java
file for the implementation. This example demonstrates several
important
details that will be important in implementing all of your designs:
- How to use constructor arguments -
for some system objects, more than one version of the controller is
instantiated, and you will need to use constructor arguments to
distinguish them.
- How to send and recieve network messages -
your objects will need to communicate with other objects in the system
via the CAN network. The controller demonstrates the use of can
mailboxes and can payload translators used to send network messages.
- How to send and receive physical "messages" -
physical inputs and outputs are modeled in the system with payload
objects. The TestLight shows how to instantiate and send and
received these payloads. You will also see how the physical
messages can be re-broadcast over the network.
- How to utilize the concept of 'time' - it
will be important for your objects to have some notion of time. This
example details how to set Timers to execute code after a
specified period of time.
Please see the comments within the file for
more detailed information.
Back to Project 1 Simulation
Exercise.
![]() -- thanks!
-- thanks! 